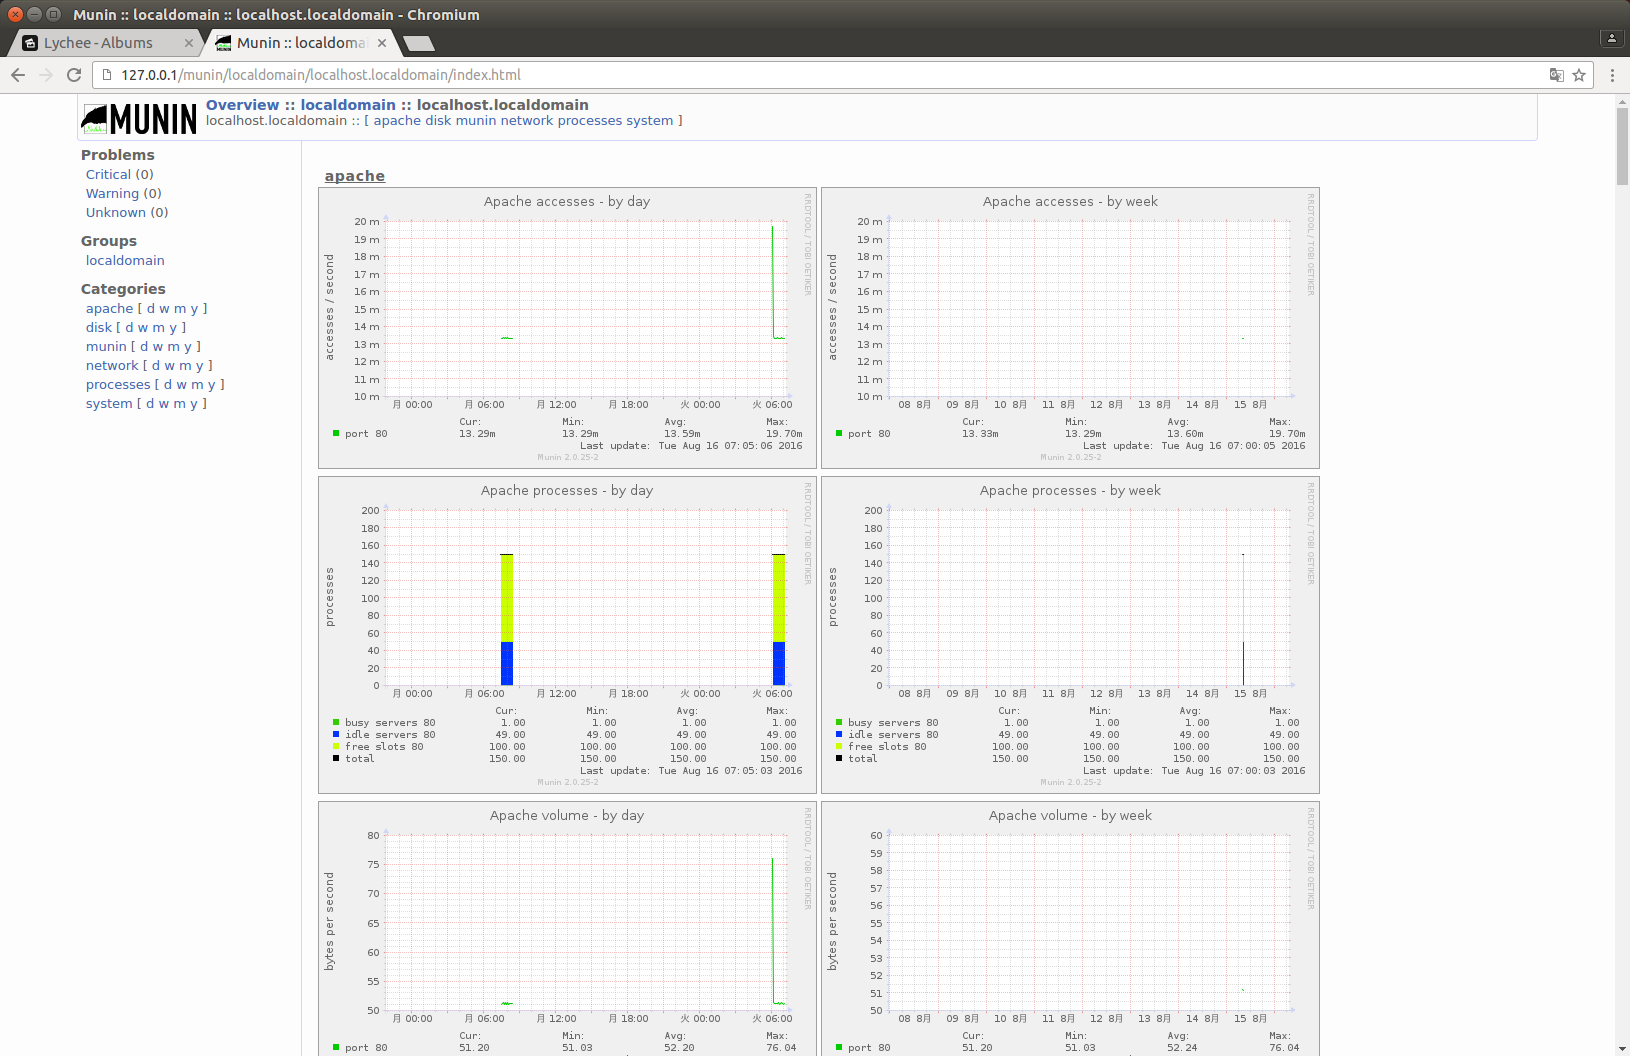
Munin は、Web画面からサーバのリソースをモニタリングするツールです。Webを表示する munin サーバと監視対象のサーバにインストールするmunin-node から構成されており、監視対象としたいサーバに munin-node をインストールする事により、各ノードからリソース情報を集め,1つのWeb管理画面で一括して各サーバを監視する事ができます。もちろん、munin と munin-node を1つのサーバに入れて、そのサーバだけを監視することも可能です。
監視対象とするサーバに、以下のコマンドで munin-node をインストールします。
$ sudo apt-get -y install munin-node
Munin サーバをインストールする予定のサーバのIPアドレスを設定します。
[/etc/munin/munin-node.conf]
allow ^127\.0\.0\.1$
allow ^::1$
allow ^192\.168\.1\.100$   ← muninサーバのIPアドレスを追加
munin-node を再起動して、マシン起動時も自動で munin-node が起動されるようにします。
$ sudo systemctl restart munin-node.service
$ sudo systemctl enable munin-node.service
munin サーバーインストールして、各ノードをモニタリングするサーバに、apache と munin をインストールします。
apache のインストールは以下のコマンドでインストールします。
$ sudo apt-get -y install apache2 libcgi-pm-perl
cgi モジュールを有効にします。
$ sudo a2enmod cgi
munin をインストールします。
$ sudo apt-get -y install munin
munin の管理画面にアクセス可能かPCのIPアドレスを設定します。
[/etc/apache2/conf-available/munin.conf]
Alias /munin /var/cache/munin/www
<Directory /var/cache/munin/www>
        Require local
        Require ip 192.168.0.100                     <- 追記
                or
        Require ip 192.168.0.0/24                    <- セグメント毎にアクセスコントロールする場合
        Options None
</Directory>

ScriptAlias /munin-cgi/munin-cgi-graph /usr/lib/munin/cgi/munin-cgi-graph
<Location /munin-cgi/munin-cgi-graph>
        Require local
        Require ip 192.168.0.100                     <- 追記
                or
        Require ip 192.168.0.0/24
        <IfModule mod_fcgid.c>
            SetHandler fcgid-script
        </IfModule>
        <IfModule !mod_fcgid.c>
            SetHandler cgi-script
        </IfModule>
</Location>
apache2 の再起動を行います。
$ sudo systemctl restart apache2.service
監視対象とするノードサーバの設定を行います。
[/etc/munin/munin.conf]

[localhost.localdomain]            <- デフォルトで設定されている。
    address 127.0.0.1
    use_node_name yes

[Ubuntu;example.com]               <- グループ名;ノード名
    address 192.168.0.100            <- ノードのIPアドレス
    use_node_name yes
※munin をインストールしたサーバにはデフォルトで munin-node がインストールされています。
Munin のデータ更新は /etc/cron.d/munin によって起動されていますが、以下のコマンドで手動で更新できます。
$ sudo -u munin munin-cron
http://servername/munin/ にアクセスすると、管理画面が表示されます。